Metroid Fusion 1% Run
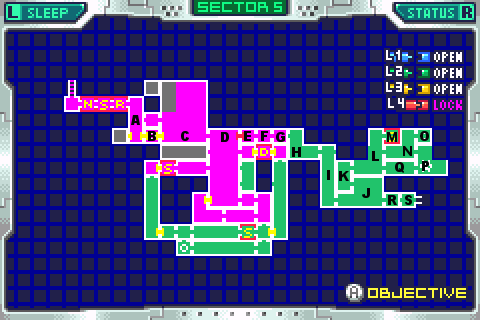
Behold the mighty reference map, and all it's glory.
To Nightmare
ARC again?!? Just what is up with this sector?
Wow, you're not going to believe this but this is a to- segment that's actually pretty awesome. Just wait 'til you see what I pull off here. Let's get started.
First thing's first, gotta get TO arc.
Upon leaving the save station, another of them jump as the door transition dealies. You're plenty familiar with by now.
Alright, let's talk about the space jump and how you can occassionally cheat it. Now as you're aware by now, you have to fall at least one block-height before you can jump again in mid air. However, if you land before falling that much, you can jump again from your landing, obviously, and jump sooner than you would have
You see me do that there on the 3rd jump, then grab the ledge and out we go. The fact that I didn't touch the buggy is a sign that I made it up that shaft extra fast, though even if I had touched him, he'd die a quick death to my charged spinning self.
Charge upon entering the next room, and fire like a madman. Keyhunters ain't so bad with plasma, now are they?
Then the main room, the power bomb takes out almost every keyhunter, but one is left by the exit door. You can tell I was fast getting to him because I had room to jump and shoot him and land on the ledge, rather than having to dance around him while jumping. Always a good thing.
My the computer is fond of dots today. You've seen this trick before, the computer freezes time, so shine on shine on shine on the platform and you'll be good to go when the blabber stops.
And once you are good to go, a quick spark into boost left and a jump and a 3 point landing. You've seen it before but still kinda nice to watch I think, also murder to pull off consistantly.
Then another boost and tiny hop to the elevator, not at all murder to do consistantly as I've done it a ton more.
Computerings, and okay, now we're ready to make letters.
You know if I didn't know better I'd say the computer deliberately talks endlessly whenever I have to go through him at the start of a segment. Anyways...
A: You know, funny story. I actually didn't have to go through the computerings at the start of this segment. I could have saved in the arc nav room if I'd known about the trick I'm about to pull.
See originally, I intented to build a boost, shine as I entered this room, then drop down, enter B, and spark right all the way to H.
I thought it was pretty nifty, but it turns out it's old news. Everyone already knows about that, and if I think about it for a whole second, I can see it is a pretty obvious thing. I mean all those doors that just happen to be open, all aligned horizontally.
It was with that trick in mind that I saved right after nettori, so I could build a boost running through the arc save room.
As it turns out I don't need that boost, I do something else not only flashier, but faster, (and a lot tougher to boot) so I could have saved after the computer with nothing lost. Ah well, live and learn, eh?
Anyways, if you'll recall episode 17-arc-ii, at the bottom of this room we move left against the door, then right again and you can build a boost. Same deal here.
B: What's up, monstro? Oh, you are.
C: Well this place has certainly changed. In fact, it's got a nice wide path opened up in front of you. Almost as if they expected someone to spark on through...
but that ain't what I do, no siree. When I reach my boost at the end of the ledge and fall off, I immedately press A to spin and A again to space jump. I call this space boosting, because it's shorter than space jumping while speed boosting, and it sounds nicer than speed jumping.
Let's talk about space boosting.
The rules for space jumping still apply. You have to fall a block before you can jump again.
Now funny thing about door transitions is they have a habit of resetting your position. In other words, no matter where I am when I go through the door at the end of this room, be I high or low, be I rising or falling, my position will be reset in the next room. And it will be reset to right on the floor.
Of course, landing on anything will break my boosting real fast. We need to avoid that at all costs.
Fortunately, there's a way. If you happen to be rising as you enter the door (holding A) and continue to rise (still holding A) when you enter the next room, you will rise, and not touch the floor. However if you let go during the door transition, or were you not able to initiate a jump right before the transition, you are out of luck.
This makes keeping that boost up throughout these rooms quite the challenge to say the least.
also, since our horizontal speed is mach eleventy billion you have zero time to think on your feet as far as how to space the jumps so you're rising as you enter the door.
Fortunately, where reacting fails practice prevails. A simple matter of practicing and studying every room for markers to go by will make it much easier to get that rise as we leave.
The number and placement of jumps was precicely calculated by yours truely. Well the number was anyway, one jump usually needs to be precice, whichever one will set up the others best.
So I try to have markers for whatever I figure is a key jump.
In this room, it's jump 2. See how on jump 2 I kind of hit the top of that magically floating column with it's guts torn out? That was my marker, I hit that with that jump. Then the other two fall into place.
D: Alright, once again, jump 2 is the key one. See how on that jump I hit the underside of that hanging... thing that's there? Yeah, that was my marker. And jump 3 is the one that happens right before the door.
E: Without a doubt the toughest and most responsible for my restarts room in this thing.
Here's the problem. You have to let go of the button really early when you enter this room, but not so early that you land on the floor, obviously.
See above me there is a secret passage. The ceiling is destructable. If I rise too high, I'll boost through those blocks and come to a very fast halt.
But now that we let go early, there's another problem, and that's managing to rise upon door transitions.
The only way to manage that is two jumps, really really quick and rapid in succession. It's easy to land on the floor due to not holding the button long enough for the first jump, which is the key jump. If you hold it too long though, you won't be able to jump again before hitting the door. It's tricky, but I got it.
F: Much easer, just let yourself go all high and come back down, only one jump in this room and that's the one right before the door.
G: Alright, more tricky timing. The second worst room in this trick, next to E of course. The button must be held for a mediumish length, then another real quick hop. Too much holding of the button will run you into a little outcropping on the celing while going down the diagonal path in the next room, but holding it too little will land you on the floor of that diagonal path.
I'm making it sound worse than it is, there's decent margin for error and the holding length is very intuitive, for me at least. By that I mean it's not something you have to work at teaching yourself, it's kind of a natural thing. But anyways, yeah, once you're on your way down that diagonal path
H: This is where we'd have stopped if we'd sparked, in the beginning of this room. Actually, I don't know why the map shows this as a seperate room from G. Did I miss a door somewhere? Well anyways
Upon reaching bottom just do some nice and long jumps and one will be in fine position for that last door.
I: Alright, third trickiest room. The goal is, much like the E room, to release jump right as the room is entered, but not until you go up a tiny tiny ways first.
And to do this is to break through the destructo blocks and land on the crumblies. Yay!
All told this little trick saved about 2 seconds. Probably not worth the trouble, especially considering the ease of the spark. Sure cool to watch though, ain't it?
alright, hugging the right and shooting down encase any fishes are in the way, the top two might have been, the bottom one never is.
And out we go.
J: Pirates can breathe underwater? Swell.
Alrighty, let's talk about the plasma beam and it's piercing capabilities.
The plasma beam is to enemies what the wave beam is to household objects: it goes through them.
While the plasma beam is touching the enemy, they take damage. When it stops touching them, no more damage. Pretty simple, eh?
One good example of this is space pirates. One fully charged plasma beam released from afar will probably kill a space pirate.
If he's standing still or walking away from you, I should say, it will kill the space pirate. The plasma beam takes its time to pass through him, damaging him the entire time.
If he's walking toward you, however, the plasma beam passes through him quicker, and won't hurt him enough for a kill. That's why I had to missile this fellow.
Don't kill the fishies too early or they'll combine with the second pirate, then he'll be mean.
As it stands the second pirate is already kind of bothersome. He's semi-random. If he walked left, he'll shoot at you. You can't jump pirate shots underwater, don't try. You gotta duck it. But then you can kill him.
If he walked right, you can kill him before he shoots, and you saved yourself some time cause you never had to stop running (or what passes for running underwater). This was the case in my video, go me!
Now for that last pirate, who's mutated by now.
Hey aren't the X supposed to only be able to replicate things whose dna they stole? I didn't think they could INVENT creatures to take the form of, but I've sure never seen any fish pirate mutants before. Oh well, details.
Fishy pirates will only die from a FULL DAMAGE plasma beam chage. Yeah, gotta be up in their faces. Fortunately, this one is happy to oblige, and will gladly charge up and get his face all up on you. Deal with him accordingly.
And some painfully slow jumps, and out we go.
K: Very sporting of these fishy pirates to not be shooting fireballs at me before I have gravity, isn't it?
Ledge grabbing and pulling up is not affected by waterness, so it's now faster than just jumping straight up, when vertical distance is all you need to cover.
L: More Monstros. I wonder if they know the guy from B.
Monstros laugh at your puny beam, no chance of killing them unless you feel like stopping and unloading a bunch of missiles, which I do not. Instead I must jump in between them and try not to get hit.
M: Phew. :37, not bad considering all that elevatoring. Well this was quite the segment I must say. But nothing compared to the next one I'm sure.