Metroid Fusion 1% Run
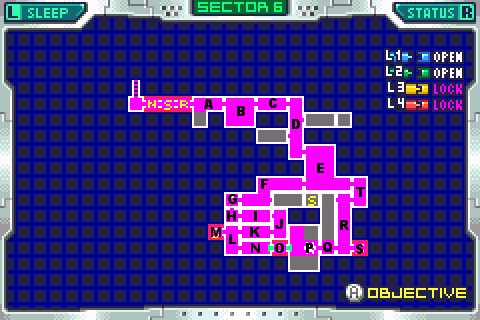
Behold the mighty reference map, and all it's glory.
To Mega X
All told a very simple and very short segment. A nice break after PYR I'd say. Now, you'll notice at this point that I have zero missiles. Lots got used in PYR, eh? Almost makes me glad of that forced missile expansion I got there.
Fortunately, no missiles need be used on the way to Mega X, and while many will be used afterwards, Mega X will refill them all for you! Isn't that nice of him? Oh quite.
Also I am convinced that every time it's best for me to save before the computer, that's when they decide to put in a lot of scrolling. Ngh. Arlk. Ralph. So much... scrolling...
Alright, boost to the sector 5 vator, a little hop to break the boost and land on the vator fluidly. If you practiced this maneuver a lot for segment 9 as I did, you won't have much trouble with it this time. If you had to keep trying segment 9 as much as I did then you can't help but be good at it by now.
Anyways, 2 minutes into the segment, we are finally onto the show.
A: Alright, a the whole point of all that scrolling and elevatoring was to be able to have a speed boost when coming into this room. Crouch to charge a spark. Also, you should have a charged beam coming into this room as well.
Now what you want to do, is after charging your spark (as far right as possible without falling off, as if I needed to say it) is to do a tiny hop (spinning so as not to activate your spark, just make sure to step right a bit and hold that when you start your jump) over the ledge, using your charged spin to kill the fly guy that's deciding to hang out down there right where you need to be. A real short hop, cause all the time you spend before sparking is time lost.
Once you're down, immediately tap A to spark the heck right.
Ah, a shinespark first (in this run at least). Here you see ye old trick of sparking into a slope, and now you're no longer sparking, you're boosting!
To do this, you must spark horizontally into a slope, and HOLD THE DIRECTION YOU ARE SPARKING IN when you hit the slope, otherwise you'll just stop. Same as how in a speed boost, you must hold the direction you're boosting in or you'll stop boosting.
Now, obviously once your spark turns into a boost, you can crouch again to charge ANOTHER spark, and so on for as long as you have slopes. The most famous use of this technique is to get the famous fusion easter egg, which you probably know about, but if you don't I'll show you in a later segment. But as you'll see in this segment, it has plenty of uses elsewhere.
One is right here! Make sure that once you start boosting, you shoot the door or it'll put a stop to your boost real quick. To the next room!
B: Boost on through and crouch to charge another spark when you're as far right as you feel safe being. Then run down and when you fall off that second ledge, you're going to want to hit A in mid-air to spark right. If you do it in the right spot, you'll go right through to the rightmost wall of the room. As usual, the background makes fine reference points for where you need to be. I used that big metal hand-like thing in the background for vertical reference. The veritcal is all you need to be concerned with here.
Remember in segment 9 (boy I like talking about that one, don't I?) I mentioned that if you hold the jump button when hitting something after a spark, you'll jump from that point as if you were standing on something? It still works. Use that to get on the platform above where you just sparked, then move up and out.
C: This mighty room will test the very mighty limits of your mighty running powers! All of you who value the skill of holding right and... continuing to hold right, hear me now! This room is your playground and your arena, your desert and your garden, your stars and oceans, your salvation and your damnation. This room, my dear lover of running, is where you are in your element.
For those of us who don't particularly care about running, there's nothing to see but a blue X. One of many that we'll be casually running past.
D: Right. Left. Rite. Left. Write. I have a craving for pong...
E: Run, shoot and jump, in that order. Riveting commentary, isn't this?
Make sure you shoot diagonally and take out the top two blocks. These particular blocks are the giant breakaway blocks that we saw in segment 7. One shot will take out two. Don't take out the bottom one, it has an Ice X. Just jump and go.
Once off the ledge, hold left and shoot where I shot. Grab on and morph through, unmorphing on the other side.
That Ice X on the left, well I'm not sure what's up with it. From my experience, Ice X's don't seem to move after you enter a room until they spot you, yet that one does not always appear in the same place. He's usually above a bit, so shoot while falling after the unmorph, and again when jumping over the gap. He might be close, he might be far, but shooting will keep him stunned long enough for you to sneak yourself past.
F: Ain't this a nice big room? What you're going to do, is run left and build a boost. When you break through the blocks (left as you feel safe with) you charge a spark. You drop off the ledge and spark right when you're low enough to hit the slope. You hold left to spark into boost, open the door before it ruins your day, and keep boosting through the door. Capice?
G: The only trick in this segment that could be classified as difficult.
You're going to jump mid-boost, and when you're exactly to the left of the e-tank, you're going to morph in mid air and drop like a stone, lay a bomb, and fall into the gap.
This, like all high speed tricks, must be practiced extensively. You need to build muscle memory. I had the luxury of save states, so I was able to practice this over and over and over until I had it real good. You are not going to be able to look real close to determine when you are right where you need to be to start the mid-air morph. Your eyes are only what give you the basic idea that it's almost time. It is your muscle memory, the fact that you have learned a sense of timing for this particular trick, that allows you to pull it off consistantly.
This trick didn't give me much trouble during the actual recordings (especially compared with things in other segments) because I was able to do this. I warn you: if you are doing this on the cart, and do not have the luxury of extensive practice with save states, you may wish to reconsider doing this. It's very easy to hit the e-tank. It's also very easy to be too far left to fall down the shaft. On the other hand, there's probably nothing else that will give you trouble in this segment, so if you need something that makes it worth trying over and over, here's your thing. Though why you'd want to do all that computering over and over at the start of the segment is beyond me.
Obviously, if you must err, err left, for that can be corrected after you lay your bomb. Hitting the e-tank cannot. And we drop down into
H: At this point I used something Nate pointed out to me in an earlier segment: If you morph right before hitting the ground, you won't bounce, and save a bit of time there. That is indeed the case as you can see by the video. And through the door we go. What fun!
I: Hooray, more SA-X dodging! It should be a national sport, it should. Probably the most interesting thing to watch in this segment.
But first, you gotta go right, lay your bomb, roll left, and wait. and wait. and wait. Can you WALK ANY SLOWER?
Oh yeah, it's important that you know WHERE to wait. See, funny thing about the power bomb she's about to throw off. Even though the animation for the explosion is the size of the whole room, and even though power bomb blocks get destroyed for the entire length of the room, the area that damages you is actually about half that size. Go figure, eh?
As if I needed to keep saying it by now, use your surroundings to determine where you need to be. In this case, you need to be in the middleish, such that green is below you, and grey is above you, as far as the tiles surrouding the morph ball tunnel. You're in the right spot if you can see the light-aura around the SA-X, but not the SA-X itself.
Now, even though the power bomb hurt-zone is only half as big as the animation, it lingers until the animation shrinks down. Once it does though, time for an SA-X chase!
The SA-X is currently ahead of you. An SA-X chase usually requires the SA-X to be behind you. Changing places is a snap though. Just jump and fire to get her attention. The SA-X likes to jump, well, the exact same height every time she jumps. Which is really high. She also can't seem to grasp the concept of walking off a ledge. Always has to jump off it seems.
Yeah... Adam says the X gain the intelligence of what they copy. Don't you believe it.
Anyway, what this means is that after you fire, run right. The SA-X, out to get you, will go right, and jump. You hop a tiny hop, and she will jump over you. Then continue right on your merry way. Don't forget to jump over the gap.
J: Run Forrest, run! The set of crumble blocks will provide you with a quick way to the exit. Hardly deserves to be it's own room, do it?
K: Drop, shoot the wall, and continue through. It only takes the tiniest hop to grasp onto the ledge beyond the breakaway wall, so be quick, you've got a walking artillery sale on your tail.
L: The scary music stopped. Though calling it music might be a tad generous.
M: A very pleasant segment, eh? If only there were more like this. :19 at the save. Very decent if I do say so.