Metroid Fusion 1% Run
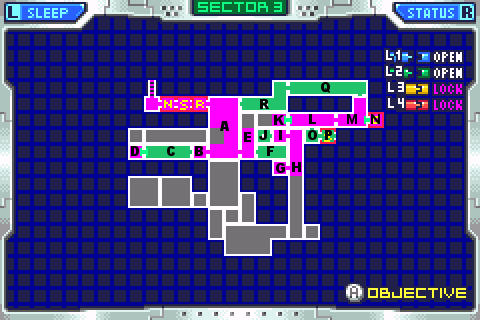
Behold the mighty reference map, and all it's glory.
To BOX
If you thought perfecting Serris was tricky, who boy I dunno what to tell you.
The simple goal of never slowing down (where can be helped) will cause you to do some tricky sticky things in this segment. Leave us go into detail:
First you'll note that when going to the elevator, I do a quick hop to it to break the speed boost rather than some kind of crouch stand crouch or similar. The reason, it's faster of course! It's not so hard as it looks, basically just about the shortest hop you can muster once you enter the room. Still, it's reeeeal easy to screw up, and is only one of the things needed to not slow down.
Hoo boy that computer talks forever, don't it? They had to pick THIS segment to stick in a computer that won't shut up, where I have to scroll through every time I want to try it over. And I had to try this one over quiiite a bit.
At this point I'd like to apologize on behalf of my sloppiness. When ever there comes a segment that I need to try over and over and over and over (ESPECIALLY one with lots and lots of computer scrolling at the START of every try) I tend to get sloppy. I was veeerry sloppy with the scrolling here, and you'll catch one point where I let a big chunk of it slide without speeding it up. I still released the segment because, well, I wanted to be done with it quite frankly. Also I was anxious to get to BOX. Of course, if you're one of those people who's watching the quicktime versions nate made, and just skip past the computer anyway, you probably won't care either way :P
Alright, half way into the segment, I finally enter the rooms where I actually DO things.
A: You want to be at full speed boost speed when you enter this room. That's why I couldn't save at THIS save station. I had to run through it to build the speed and things.
While running at full speed, you can take advantage of a nice little shortcut they built in. Later I found that I didn't take quite as good advantage of it as I could have :( But hopefully the various things I do to not slow down here and there will gain me enough time to make up for it.
Anyways, just keep running, right off the edge, and you go through a bunch of booster blocks and land on some crumbly blocks. When you drop out the other side, go left a-shootin'. And you should be boosting by the time you get to...
B: Crouch to charge, then you're going to want to do a mid-air shinespark here to get things to work out the nicest. A mid-air shinespark is done like so:
-Spin Jump (by holding left/right and jumping)
-When at the height you want, Break the Spin (by hitting up/down or shooting)
-Hit jump immediately after (don't forget to hold the direction you want to spark in)
Easy concept. Any time you hit jump without spinning, you'll spark. So you want to jump and spark left when high, in order to break through all the blocks in the next room.
C: Fly on by and morph into the little tunnel. I did a mid-air morph and sprang into it. By no means necessary though :P
D: Open Seseme, says-a me! Green doors now open.
C: Gasp, X's! We have let them in! On second thought, ignore them. Just boost on through. As soon as you build a full-on boost, crouch to charge, then do another of those mid-air spark dealies. As always, use the background as reference for where you want to be. You'll see in the video there's this horizontal... line thing in the back background that's just level with where I spark. That's a good thing to use. Spark right through the speed blocks
B: Not much time to admire this room, as you're going to spark right on through. If you were on target that is. Luckily, someone conveniently left the door open for you. How nice of them!
A: run run as fast as you can, you can't catch me I'm the shinespark man! Whoops, this door wasn't left open. Guess that ends that :( Shoot it and move on through, and remember your manners, it's polite to charge when leaving a room.
E: Here's another fun little thing you can do to keep from slowing down. Now you could just pummel a few missiles into the stretchy toothy dude, but missiles are VALUABLE. We're not going to be stopping at recharge stations cause you chose to be careless with them, are we? DO YOU KNOW HOW MUCH TIME RECHARGE STATIONS TAKE? Seconds don't grow on trees you know. Save your missiles. Invest them. Get a savings acount, save them for a rainy day. Don't use missiles if there's another way. You have 10 max and I'm already down to 7 by this point.
Anyway, the point is, you can kill stretch without slowing down and it'll only cost you one missile and some practice. A bargain if ever one was. Observe:
Remember that full-damage point-blank bidness? Well, you can kill stretch with one FULL DAMAGE shot, and a missile besides. Not a terribly easy combination to pull off on something that's flying toward you while you're flying toward it, but the premise is, when you're real close to him, you hit the missile button to release your charge and immediately unload a missile. He dies, you keep going. It needs to be one smooth natural and most of all FAST motion, but by now you're no stranger to the whole "quickly fire a missile after a charged shot" thing anyway. You should make air quotes when saying that.
But I'm getting off the subject. Once stretch is dead, you fall down the crumblies, shoot the gate, then move back to where you started. Wasn't that productive?
Now we're starting another speed boost here, so again, use the background to mark where you should be. If you've cleared the brown... things, and samus is in the pink, you're golden, clear?
Run to the right and
F: Zoomy zoom zoom, use the background to know where the speed blocks are. Now your goal here, is to crouch and charge a spark, when you're half over the speed block and half not. Being half over will make it so you break the speed block, but half not makes it so you still have ground to stand on to charge your spark. Takes practice, as all these things do.
Once you've managed that, go right into the gap and down the crumbly
G: Don't use the spark yet, just land and move right through the door like normal. Quick like a bunny! Don't let the charge wear off.
H: The H shaft, and stretches all over the place. Yum. Now, normally you'd have to climb a ladder and dodge stretches forever, but thanks to Sesshoumaru's law, we know to find ways around ladders. Luckily, clever you, you have a shinespark charged here, so by all means, just spark on up. Be quick about it though. If stretch gets to you before you start moving, kiss the spark goodbye. And left we go.
I: Your goal is to lay a bomb that third block from the bottom. Jump and morph mid air, or just morph and spring up, whatever you feel like. I figured the first is faster. Say that 10 times fast. Spring into it just as it explodes to minimize time lost.
J: here it is, the 1% in the 1% run. If anyone can find a way to avoid getting this missile expansion, you'll have the admiration of all the land. Well all the fusion low% runners anyway, all 5 of us. It's been searched to death though and looks pretty impossible from here. And I'm not going to complain either. Missiles, as I said, are VALUABLE, and a forced 5 more ain't gonna do me any harm.
Lay a bomb right before you touch the missile to get a head start on the passage above you. Then up you go. Bomb on through and whoopedeedo
K: Freedom from the maze! Ah, smell that fresh PYR air. That purple barrier X on the left is what forced you to take this roundabout way by the way. If there were a way through that, you could just walk here from room E and avoid that forced missile expansion to boot. Seems pretty break proof though :( Anyways, move on right, and remember your good manners.
L: This room was the cause for my immense retries. I think the random number generator just decided to hate me for this segment. But the point is, there's a way to get through here without slowing down, but the hoppidy dudes have to behave themselves.
Hoppiedies are twice as annoying as most enemies because they have FOUR directions they might want to move in once you enter the room. Short hop left, short hop right, or BIG hop left or right. Ain't that fun?
There's 3 in this room. Lemme break 'em down for you real quick:
Hoppidy 1: He's not going to get a chance to hop. Once full-damage charge (point blank) will take him out, and you're going to do that right away. Make sure to start charging again immediately after. Only release the button for a split second.
Hoppidy 2: Of the 4 ways he may move, 2 are good. The two to the right. Get that and you'll be fully charged by the time you get to him, which allows you to deliver a full-damage shot to his keester. Deathification!
If he moved left, no luck :( That's not entirely true though, if you were REAL fast with recharging after the first one, you can barely barely manage to release a full charge onto the second if he did a short hop left. It's very tough though, and you'll probably sooner get a hop right than manage that. If he does a large hop left, there's no hope, sorry :P
Hoppidy 3: You can't get another charge going by the time you get to him, but you CAN get your speed booster to kick in, if and only if he did a big hop to the right. Any of the other 3 possibilities, and you'll have to think of something else. I'm sure I don't need to tell you how important it is to have the speed booster kick in, as it allows you to spark through the next room and save several seconds.
Of course, this means you're going to have to try until you get this 1 in 4 occurrance. That's after getting the 1 in 2 occurrance of a good second hoppidy. That means you'll get this room to work about 1 in 8 times statistically, and for me it wasn't even THAT frequent. Hopefully you now see why I got so sick of this segment, and got sloppy with the computer scrolling :P
Anyways, if you somehow eventually manage to get this room to go well and the speed booster kicks in, crouch by the door after killing the third hoppidy, open the door and mid-air spark on through it.
M: Not much time to enjoy the scenery, just shoot the door and continue right
N: Hooray, super missiles! And just in time to kill a giant robot too. That's later though, for now, run back left
M: Here again. When the boost kicks in, charge and spark left. Remembering to open the door first of course.
L: The horrible L room that I hated so much, and it's been destroyed! Serves it right. When you hit the wall on the left, you're going to want to minimize the number of landings, which means don't land on the ledge, land on the dirt.
Funny thing about sparking, if you hold the jump button when you hit something, you'll actually jump FROM that point, just like you wall jumped off, except you can go whichever direction you want. Very handy. Use that to avoid landing on the ledge, and land on the floor instead.
And now all you have to do is move right and drop down to the save point.
O: Be careful, it's easy to accidently land on or grab a ledge here. Maneuver around and go in the door.
P: Well I think we can safely say random factors suck at this point. But all those retries paid off. :16 at the save.