Metroid Fusion 1% Run
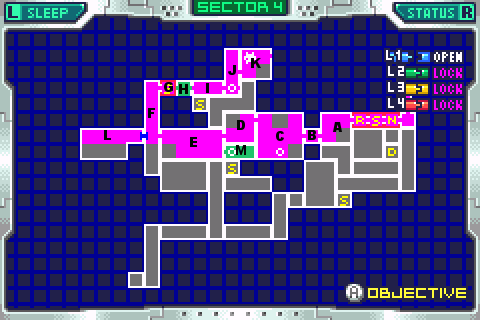
Behold the mighty reference map, and all its glory.
Serris
If you didn't notice slowdown in the last segment, you'll probably notice it here. Emulation ain't perfect after all. The game seems to have problems keeping up in 2 situations:
-lots of moving things in the room (doesn't have to be on screen, just in the room)
-really fast moving things. Namely Serris.
Don't worry though, the strategy I used will certainly work even at normal speed. You'll just need to react a bit quicker than I had to. Alrighty, let's get it aawwwwn!
G: Hole to the right, what a sight
H: A bombable passage that serves no purpose other than to slow you down. Joy!
I: Hi Bones. Too much fiber, bud. Walking through the water, walking through the water.
J: Wall jumps up (aren't they fun?) and a full damage charge to the boss door. Once again, if he ain't vulnerable immediately, one may wish to try again. I know I did. I did just save, after all.
K: Here's the main attraction. Ole Scaley.
Alright, remember the whole full-damage charge schtik? Encase you forgot, when you release a fully charged shot, there's a little 'swoosh' animation that passes in front and below of the gun. That swoosh does damage that's seperate from the damage of a shot. This means if you shoot something from right up in its face, you will do more damage. The major use thus far has been for boss doors.
This also means, to beat bosses quickly, charge shots must be delivered at, yes, point blank. Serris is the first who will require this. You're going to need to get right up in the face of this speedy bugger and hit him from inches away. Not terribly easy, no.
The good news is, if you hit him full damage, he dies in two hits.
And I have even better news. Serris's moves are semi-random mostly, but at the beginning, he always goes in the exact same way, so you can easily (relatively) get shot 1 onto him with virtually no reflexes needed. Just practice.
Do the math and you'll see this means you only have to improvise one more full-damage shot onto him. It's just a matter of retrying until you manage it. The fact that every restart also requires you to go through the boss door again (which itself requires restarting if not perfect) is some cause for frustration. In fact it was major cause for frustration with me. I got it though, as you can see.
Alright, now about that first shot. See where I stood? Yeah, stand there. Aim diagonally up, and Serris will, every single time, fly right by you just as he becomes vulnerable. When your gun is inside his brains, blow them out.
Now serris goes into his little frenzy. It's very easy to avoid being hit by his frenzy. Just grab the ladder above the middle of the platform there, and only one attack he has can ever hit you: the one where he arcs over ALL the platforms. That spot is even safe from the small little jumps he does. And know what else? He only arcs over ALL the platforms IMMEDIATELY after he snakes through them. So that's your cue to drop, then jump back up when he's passed.
Simple, no? Simple yes!
There's really no good way to keep track of when he's about to come out of the vulnerability. Not that I've found at least. You'll just kind of have to guestimate when he's about to come out of it. Once he does, drop back to the platform with your charge, and hope for the best. With some luck, the next time he comes on screen he'll pop his head somewhere that you can rush up on and get full damage with. From the middle platform, most any attack he does will put his head at a place you can hit. You just need to learn where he goes and such. This is the only part of the fight where the slow-down gave me an advantage. And it's a good degree of luck anyhow, so the 2-hit kill shouldn't be much worse to do on the actual cart. If you ask me, the d-pad and inability to practice with savestates are a much greater detriment to your success.
And there's the core x. 23 flashes until they become vulnerable again. This one takes 5 missiles to down, and the sweet spot is a bad spot, over the water between platforms. Do your best to lure him there and connect with your final missile when he's on it. Once again I find the figure-8 type motion that you see me do a good way to control where he goes until it's time to lure him out to the sweet spot. Just don't lose track of how many missiles you've put into him, or you'll kill him without remembering to lure.
And the speed booster is mine! Now I have mighty shinespark powers! I'll have fun with that I'm sure. But later. We've a more important issue to decide now. Namely, the way out.
For you, if you're trying this, you're gonna wanna go right. But if you want to be showy and impressive and you're recording like me, then you may want to go left, and do what I done.
J: yay, it's J! Why am I in J you ask? Well if you're asking that, you didn't watch the video. For shame!
Something found on gamefaqs a while back was that it's possible to wall jump off a single wall, if you're underwater (without gravity, obviously). It's... not fun to do consistantly, and to make progress is sloooooow. But I figured that this here situation is a fine use for it. You can wall jump back out the way you came. Ain't it neat?
According to my precice and pain-staking calculations, this way is faster, I think, by maybe a secondish. Overall, probably not worth the trouble. Especially after getting a perfect boss door and serris fight. If speed's your concern, go around. But if you want your video to look neat, well it sure do look neat, don't it?
I didn't do it perfectly, it should only take about 12 jumps to get out, I got hung up a bit on the splish splish half-in half-out of the water bit. It takes a lot of practice to be able to adjust to the changing speeds on the fly, but not much else
I: Hi Bones, I avenged you. Yeah you're welcome.
H: Transform and roll out
G: Save if you want. Saving takes, like, 10 seconds, but if you're worried about screwing up in what's to come, then by all means. I didn't cause I don't think there's terribly much dangerous about going to the nav room from here, and the nav room would be a better place to end the segment. Of course it's all moot if you didn't come this way, but yeah.
F It's Crabby's Revenge! Going down this room is a lot nicer than going up. Shoot the breaky blocks and missile crabby before jumping, lest you regret it at the peak of said jump.
Down, Down, Down, that's it, going left. You'll end up here no matter which route you took after Serris.
L: Ahh, my first speed boost. Feels good. Computer type things seem to freeze time, so if you hit down to charge right on the pump station platform, you'll still have a charge after it activates, allowing you to spark on right, save mondo time and look cool to boot.
H: Just passing on through
E: Morph under, out and down. Missile the crab to your left and use the background to mark where you need to start your run. Swift Missiley Death to all crabs in your way as you run right and boost on through to
M: faster than a speeding serris, look at her go!
C: Hey, the ole C room. See room? Not for long, just ignore anything in your way until you get to the door, which you're probably going to want to shoot if you don't want it to stop your little marathon.
B: Uh-oh, I forgot my good manners! I forgot to hold the fire button after opening the door to get a charge built for this crabby who miraculously appeared, so I had to missile him. I didn't forget to charge that time though, in preperation for... a gold crab? Maaan is he fugly. Kill him quick, and run on out. You have time to grab the x he leaves if you want, since the door takes a minute to unlock anyways.
A: Another wall jump off the ledge side, just cause I can. And that's about it.
Saved in the AQA nav room because I need a big running start at the start of PYR. You'll see what I mean. :14 on the clock. Giggidy Giggidy Giggidy.