Metroid Fusion 1% Run
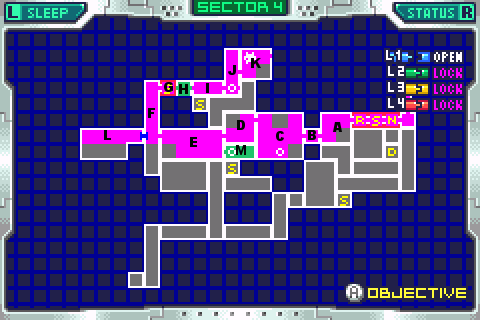
Behold the mighty reference map, and all its glory.
To Serris
Overall not a bad segment. Quite a break after the last one's randomness, in fact. This one, blessedly has none. In fact, it was kind of boring on it's own, so I had to throw in a few useless but showy things here and there to make it worth watching :P Well, let's get to it
A: A little hop will do ya. The Wall jump off the side of the platform there is one of those useless but etertaining things I mentioned.
Hold left when dropping to the door, landing is bad, remember.
B: And the award for the most useless room in existence goes to... can't quite get the envelope open... ah, the B room! *applause*
Remember to charge your beam as you leave
C: C is for Crab. Let's start this room off with a bit o' everyone's favorite pass time, wall jumping! The crabs really don't move a lot from their starting positions, they're slow and stupid (ugly too).
Crabbies are weak. One charge shot (not even full damage) will take them out. A charged-spin (pseudo-screw attack or whatever you like to call it) also does it. Crabbies can be a problem sometimes because their projectiles have big range, and if you're near them, are often impossible to dodge. The way you usually want to deal with crabbies, therefore, is kill them before they fire.
Now then
Your charged spinning self will ensure that the crab on the wall is no problem for you during the initial wall jumpings. Jump high, so you'll have room after the last one to morph mid-air and lay a bomb.
over and under, minimize the time in the air as much as possible. Og the caveman says: fire good, air bad!
Enter useless trick number 2: Touching the electric water for a split second. You will get the 'zapped' animation, as if you were hit, but you'll take no damage! This is very very very hard to do consistantly. You probably won't want to do this, as it's obviously useless. A nice bit o' showmanship flare though, I think.
Hop Hop, over the first crab, and land on the second. Now you're going to want to fire diagonal down while you're still a ways from him, for quick death. The reason you can't just spin into him, is that unless you did everything else in this room faster than I did in the recording (yeah right) crabby there is going to fire some ouchies off as soon as you get to him. You need to strike pre-emptively.
Of course, if you did the early part of this room slower, then he might fire before you get to him, allowing a safe spin-kill. Take your pick.
Well, so much for this room. I'll miss you C room. Make sure to charge as you leave. It's common courtesy.
D: And these crabbies sure do appreciate that courtesy! Alright, two crabs about to shoot ouchies at you, and you need to take them both without slowing. Can it be done? But of course!
Fire your charge diagonal up and quickly again a missile diagonal down and they both go byebye. Remember, hitting the missile button will fire a charge off. Use it for convenience in cases like this.
Now, here's a real tough trick to pull off. Landing is bad (Sesshoumaru's Law) so if you can get down that shaft on the left without landing on anything, that's best. The only way you're going to do that though, is a wall jump off the side of the ledge, with the jump button held PRECICELY long enough, so you don't bump into the ledge on top (thus slowing your horizontal speed) and you don't land on the ledge below you (slowing your vertical).
There's also a crab there waiting, so make sure you charged your beam up after shooting that missile a moment ago. If he moved down after you entered the room, you'll hit him, so make sure it's you that hits him, not the other way around. If he moves up, it's like he's not even there, but keep the charge to be safe, as you probably won't have time to notice which way he moved and act accordingly.
Remember, if I've said it once I've said it twice, 90% of the things in my videos that look like good reflexes, are just knowing what MIGHT be coming, and being already prepared to deal with it. A minute of planning is worth a year of reactioning. That's Sesshoumaru's Law.
Out the door, remembering your good manners, and charging your beam before leaving.
E: Fire up and away to save the day. Crabbies must be an endangered species by now.
Also, right above you is a shootable block that you need to attend to. You'll want to kill the crab and shoot the block and jump in one swift motion. Release, Up, Fire, Jump, all in rapid succession. Requires a little practice to be real quick with it, but nothing one would call 'difficult' I'm sure.
Lay the bomb, move out, and run and jump. Make sure you're still holding the fire button from laying the bomb, cause you'll need a charge, and having to shoot to charge while in the air or on the ladder just ain't nice.
Also, it may be possible to outrun your bomb, and hit the blocks before they disintigrate, rather than the ladder, but it never happened to me, so I wouldn't worry about it if I were you.
Ah, ladder ladder, I do hate the ladder. As for when you're able to let go and land on the ledge, that's just something you'll need to acquire a feel for, based on how close you are to the ledge. You'll need to kill the crabby lest he shoot ouchies, and this is important:
Let go THEN fire. It'll have to be RIGHT after, to still be high enough to kill crabby, but if you fire first, you'll kind of be paralyzed, unable to even let go of the ladder for a while. ladders are stupid like that. so fire after you're airborne. Don't focus so much on that that you forget to keep holding left though, landing on that platform is also kinda important.
Bomb on through, once again, unmorph, then re-morph as the bomb explodes to keep from bouncing and losing time. Then that's that
F: Ah the F room. In many ways the most exciting room of this segment. Of course, there were only 4 rooms total of any consequence, but still, being the best of 4 ain't bad.
Let's break the place down. Above you you have a giant breakable block. Now the nice thing about giant breakable blocks, is that even though they look like they're made of 4 blocks, they're really just one big block. One shot anywhere on it takes out the whole thing. Isn't that lovely, mmm?
We'll be using that right now. See, you want to wall jump up that shaft, but there's a spiky tyke on the wall that can screw with you. But clever you, you're going to aim up and release your charged beam (you DID remember your manners, right?) as soon as you enter. One part of your shot (after charge beams, your shots have two pieces remember) will take out the block, and the other will continue on to spiky. Piece o' cake.
Now, again this should be in one fluid motion for maximum speed. Up, release-re-hold, left, jump. You can jump as soon as you release the shot if you want. I don't think you can outrun it.
Jumping against the left side first will allow you to come out at the left side at the top. When wall jumping against a ladder, you have to be extra careful not to be holding right when you hit it, or you'll grab it.
Remember that shoot-during-wall-jump thing I found back in segment 5? It makes a return here! Wall jumping off the ledge allows you to skip a piece of the ladder (ladders are bad) and take out that break block now, so you won't need to delay your jump later when you get there.
Now at this point, there's another spiky dude, and there's two places he might be. One, real close to you, or two, upside down on the top of that block-high gap ahead of you. The first one is the best one, but neither is a problem for your mighty charged self. Just kneel, release, then morph. One part of the shot goes to spiky, the other to the breakblock.
Wall jump up, starting from the left again. No time to charge your beam after the unmorph, so it's up to your missiles. Crabby dies to a missile, and you're going to hope he wound up to the left. He might wind up to the right, like right above you, and he's a bit harder to missile without dying then. If you want to plan ahead, you could stop a moment to fire a missile straight up before you start wall jumping encase he's on the right, but I want to avoid any possible slowings downses, so I just waited for him to be left. Spiky can be ignored wherever he winds up.
For the last bit, one shot takes out both blocks, and off you go.
G: That's all she wrote. :12 on the clock!