Metroid Fusion 1% Run
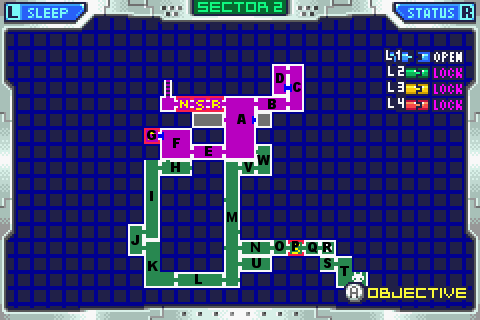
Behold the mighty reference map, and all its glory.
Giant Plant
Randomness sucks. I've said it before and I'll say it again. And random bosses suck infinitely more than skill ones. INFINITELY!
P: La la la loading screen, la la la loading screen, oh we're done
Q: Please Keep Off the spiny things. Not a very interesting room, just put in your way to slow you down.
R: You want to shoot down when you come out of the door, and drop down the pit into the next room.
Now here's something interesting to note about the momentum in this game. If you hold down DURING the door transition, you will come out of the door flying, and move too far forward and overshoot the pit
But if you hold right coming out of the door, THEN hold down afterwords to shoot, you will then stop when you hit down, and fall through. Isn't that veird?
S: Ah, the once mighty boss door. The bane of speed runners for two bosses hence. He's nothing now.
Believe it or not, a fully charged shot, fired at super close range, will kill the boss door in one. Assuming it's eye is open and vulnerable of course.
It was explained to me that the little flare animation under Samus' gun when she releases a charged shot, is actually a third hit, in addition to the two bullets that a charge shot is comprised of. So hitting ANYTHING at in-your-face range with a charged shot will be more powerful than from far away, cause that little flare will hit them to. Isn't that veird?
Anyway, you only need the dude to open up once, and it shouldn't be too hard to get him to do it on the first go. It wasn't for me at least, but I'm comparing it to trying to get 3 immediate opens on the last 2 bosses.
I actually had full missiles going into the boss fight, and even if I didn't, missiles are hardly used at all for the giant plant. So odds are you won't need to stop for the refil from the boss door. Just power on through
T: And here's the main event.
Let's be frank. The Giant Plant sucks for speed. Every time he jumps and decides NOT to open his mouth, that's about 5 seconds there. If he decides to jump 8 or 9 times, you've practically lost a minute.
This guy does indeed suck. I will now proceed to explain why he sucks, most likely in an over dramatic fashion.
*clears throat*
OH MY GOD!!!!
OH SWEET LORD WHAT DID I DO TO DESRVE THIS?
So freaking random
SO RANDOM
you cannot comprehend
go ahead try it, you can't
Alright, here's the first problem. This guy couldn't care less how many missiles you pumped into him. All he cares about is how MANY times you shoot him.
Can you take it? Can you TAKE IT?
Alright so here's the deal, when the guy opens his mouth, you must shoot up into him the equivalent of one full charge beam shot, or if you're slightly off center and only half of it goes through, a missile into him will do it too. Or two missiles will do fine. If you want to be on the safe side shoot all of the above into him. You won't run out.
Okay, he needs to open his mouth 3 times to blow off the 3 segments. If you fire any more than you need for each segment, it's basically wasted, so don't go too crazy
Once the 3 segments blow up, he'll go into speedy little bugger mode, and will open his mouth on every jump. At this point, you must fire a full charge AND two missiles at him. Then he'll die and the core x will come.
Now here's the thing. For the first 3 segments of this guy, the segments before speedy little bugger mode (SLBM, pronounced 'Slobbum'), he will most likely not open his mouth the first time he jumps. He will jump over you and land, and do it again, and again, taking 5 seconds or so of your life every time.
It appears to be random how many Wasted Jumps he will use in the course of the fight. Wasted Jumps being times he jumps OVER you, rather than opening his mouth on the jump.
I find that on average, he likes to waste about 6 jumps during his 3 segments. Sometimes he'll waste 4 or 5. Sometimes he'll was upwards of 10 or more.
One thing is for sure, wasted jumps are bad. So I spent several years, retrying this... CREATURE
AAAGH At first I was optimistic. "How many tries can it take to get zero wasted jumps" I said. I mean if I can go for perfect boss doors, why not this?
Yeah, that lasted about a day
I settled for 3 wasted jumps. In my opinion you would be hard pressed to get less, very hard pressed indeed. In fact you'd be hard pressed to get 3. I know I was.
Make sure you kill him on the first jump when he goes into SLBM, because he will waste an hour of your life if you fail.
the core x is nothing more drastic than the usual core x. 23 flashes before he becomes vulnerable again. 4 missiles will do it.
As always, the sweet spot is in the middle of the room. Do your best to kill the core x at or near there, for speedy item acquisition.
I don't think people appreciate just how much time is wasted by a core x having to float over from far away. It's plenty. Kill the core x near the Spot. It wasn't an exact science the way Eyeguy's death was, but not bad. About 2 to 3 seconds from X death to item grab. If you're super good, you can make that a zero. I sure ain't trying though, I'm just happy with my 3 wastes jumps.
One strategy I like to employ when fighting a core X is to jump around him in a figure 8 pattern, in which I alway jump OVER him, in the opposite direction. This keeps him near the center of the room, and allows me a degree of control over where he dies, even though I had no control over where he started at.
S: A few wall jumps to get back to
R: Shoot the door and in you go
Q: In and out
P: In and out
O: Gasp, they've Cocooned!
While on the subject, Cocoons are weird. You can't wall jump off them or hang off them, and the surfaces are glitchy freaky, if you jump while next to one you suddenly appear on top of it. But oh well.
N: Be charged or be charged by the hoppy thing. A spin jump at close range will take him out, as will a full charge or a half charge + missile. Make sure to avoid the flying remnents after he dies. You run faster than the remnents, so you could easily run into the one flying away from you, if you didn't kill the guy while he was hopping in the air. If you did, then you could easily run under it, so wait for it to pass before jumping.
U: Ah, the piece de resistance. The SA-X
Note the SA-X, and how PAINFULLY slowly it walks. Waiting for it to cross that long shaft and exit is long and boring. Let's spice it up a bit
Now I tried lots of possibilities for getting past this creature. But there's not enough space above she/it to jump. But ah HA
You may lure it to the right, jump into the celing, and down again to the left of her
morphing gives you a bit of extra leeway space, ensuring you do not touch the SA-X
You should then unmorph and get the hell out of there.
The SA-X has a very powerful and annoying beam, that is taller than you. And you haven't much room to jump it, you do have some though.
Alright, here's the deal. You can do one of two things when a beam is fired at you. While running left, you may jump, then land, all while never taking your finger off of Left. The timing for this must be extremely precice, and it is not something I tend to be very good at myself. The ice beam is only a little bit faster than you are when in a full sprint, so you need to make sure the ice beam totally clears you in that little bit of time when you're higher than it. Not too cool.
However, for your amusement I did make a video of it. Download it HERE.
You will notice that's not what I did in my run. Frankly, I didn't feel like tempting fate. I saved quite a lot of seconds by getting a 3 wasted jump fight with the giant plant, and losing a second or so by taking the safe approach to the SA-X was well worth it to me, especially since if I died I'd have to go back to constantly retrying the giant plant to get another good set of jumps.
The safe approach is basically the same, only at the peak of your jump when you hit the celing, you quickly tap right, just for a moment, then go back to holding left
This is easiest for those of us who are using keyboards, much more than d-pads. I'm using a keyboard for this by the way, encase my exceptional directional control didn't make that obvious already.
The quick tap-tap allows for a much wider buffer zone, when jumping over the ice beam
You see, if you are brave and just hold left the entire time, if you jump too early, you will land back on the ice beam and be frozen and subesquently dead
however, by tapping right, you can jump a bit too early and still clear it
In fact, the more right you go, the earlier you can jump and still make it, (to a point of course)
Needless to say, if you jump to late in either circumstance, you ain't gonna make it, so if you wanna be safe, err on the side of early
There IS a downside to this. You will not gain as much distance over the SA-X, who will then decide to fire more beams at you. This causes you to jump more, and since jumping is bad, you lose a second or maybe two from it. BUT, you're less likely to die.
As you can see in the demonstration I made of a nominal SA-X encounter, again, downloadable HERE, she only fires once, and I keep quite a lead on her.
Some people cannot walk and chew gum. The SA-X cannot run and shoot. Which is a very good thing, and entirely the reason why you can keep such a lead on her.
Don't worry, the SA-X will not follow you once you exit the room. She goes back into the limbo she inhabits for most of the game.
Ironically, dodging 3 ice beams probably looks better to watch, even though the fast but dangerous method required to only dodge one shot is actually significantly harder in my opinion.
But after all, this is a showmanship run more than a speed run, so I figure what looks good takes priority over what's fast ;) That and, like I said, I didn't feel like tempting fate.
M: Yes, the M shaft IS a very freakish designed shaft that is hard to go up, and harder to do anything cool in. A few wall jumps here and there for your amusement, but nothing major.
As far as the bombs at the top, if you lay a bomb, wait a little, then jump again, you should make it back up just as it explodes and into the hole with no time wasted.
V: Just run through. There's a bug thing here, but if you don't bug it, it won't bug you.
W: You can ignore Planty McHopper, just jump past him and wall jump up.
Note, encase you forgot. The BOTTOM of samus must be against something to wall jump. If the bottom of her is next to that gap in the wall when you try the jump, you lose.
A: And here we are again. Make your way up quick as you feel you can.
Well, now the traditional talk to the computer, talk to yourself, talk to the computer some more bit.
And we're done! :11 on the clock. Cha ching, baby. Especially considering I have a massive amount of save points. I probably owe a full minute to those already.