Metroid Fusion 1% Run
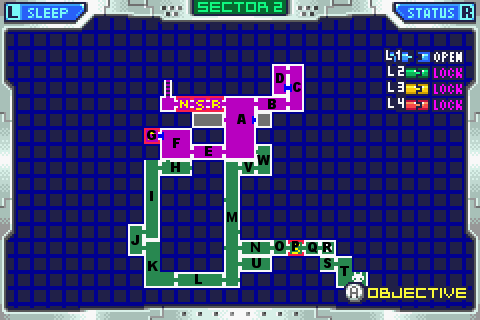
Behold the mighty reference map, and all it's glory.
To Giant Plant
Good ole TRO. You would not believe how many tries this one took me, seriously. I do it all for you, you know.
A: Alright, the first thing to notice is that those red worms are precicely ONE BLOCK thick, even though it looks like they're more. This will come into play a couple times later
In fact, it comes into play right now. Now as I go to the bottom of this room, notice how I aim diagonal down to shoot the blocks out, but I only shoot out the right block and leave the left one. That's important, cause that block serves as a blockade for your flying body, and allows you to stop before you fly into the red worm, and drop safely down. Since the worms are only one block thick, that works.
Ah, I do love the charge beam. One full shot kills the worms, yes it does. As you may notice later on, a charged charge beam shot actually consists of two 'bullets' flying foward vertically, if one bullet stops, the other will keep going. Both bullets must hit a red worm to kill it, and only if it's fully charged.
Now I do a bit of wall jumpery up the platforms. This one is tricky to master, and was one of six major tricky things I did in this run which were responsible for it taking so long to do. You have to jump as high on the wall as possible in order to clear that first platform, and you have to jump as high as possible on the top most platform to clear the last one as well. It saves time, but takes practice.
B: Tricky thing 2, the killing of the worms without slowing down.
Now, an interesting thing I noticed about fusion at this point, is that enemy spawn locations are set for rooms. Once you enter the room, the enemy will be at the same spot to start. However, which direction it MOVES in afterwards seems to be random.
As for how that pertains to this room, well the 2 worms in it will always start at the same point, but whether they are moving toward you or away from you or both is entirely random it seems. So you need a contingency that will be able to kill them no matter which is the case.
If the second worm is moving away from you, you'll have extra time to charge up your shot, but if it's moving toward you as it was in my run, you have to be quick on the reflexes
What you need to do is have a full charge ready as you enter the room, then right as you start running in the room, release your charge diagonal down. One of the two parts of the charge beam will hit the first red worm, no matter which way it is moving. The other will hit the ground. Then you must fire a missile diagonal down to finish that worm off and immediately start charging again. If you do this, your charge will be full just in time for you to off the other worm, even if it's coming towards you.
Now, several things can make you fire a charged charge beam. One of them is hitting the missile button. That's convinient, cause all you have to do when charged is hit missile, hit fire, and release missile without ever having let go of fire, and if you do it all fast enough, that'll do it, and you should be able to take out the worms without slowing down
phew
C; make sure your beam is charged going into this room, for you will need it. This is possibly the 3rd of tricky things. I say possibly because you won't always need to do it. But in the run you see, I did, just to be showy.
It turns out you can fire a charged beam while wall jumping. If you release the button during the 'crouching on the wall' animation, you will fire your beam off without breaking the jump
If you are holding L at the time, you will fire it diagonally
now the worm on the right wall of this room, there are two positions it can be at when you get to it, depending on which direction it was moving when you entered the room. If it was moving down, it won't be in your way, you can wall jump like you see me do with no problems. If it was moving up, it will be
And since you have to be able to deal with both possibilities, or at least since I did, you need to be prepared to shoot it during the wall jump
Make sure you wall jump near the top of the left outcropping, or the shot will fire underneath the worm and not kill it, and then you will hit it and be very sad.
Also, at the same time as you release the fire button, immediately repress it, if you're fast enough it won't break the jump. This allows you to charge up another shot for the worm up top before the door.
So basically the motion is holding right and fire, hit and hold L, jump left, hit and hold right hit and hold jump release and re hit and hold fire while not letting go of L all in one swift motion
yeah it's annoying to do, and you may be better off just trying for when he's moving down than trying to learn that
D: Security room. Blue doors down, hooray!
C: Out and around, and make sure your charged up when you enter
B: Tricky trick 4, which is exactly the same as tricky trick 2. Do the same thing again without messing up.
A: Back to the big room. now as you'll recall, worms are one block thick, so if you use the platform like a barricade to block your momentum the way I did, you'll fall straight through without hitting them
Aim diagonal and release your charged shot to take out the worm on the bottom, then out you go
E: Be charged when you get here, for a worm is on the ground
F: No need to charge here, cause if you wall jump quick enough and catch the ledge like I did, that flying bug thing will never bother you. There's a one block deep pit, but landing is bad, so you can cut the landings down to one of you jump it in one mighty leap. You gotta jump right at the end to make it though.
G: YEAH, I got the bombs! *makes Ash pose* Charge on the way out
F: A wall jump off the side of the dropoff will allow you to pass the little dip, if you're charged and you hit the flying thing then it will die and you will emerge unscathed, with plenty of time to recharge for the worm on the floor. Bomb down and on we go to
H: Tricky trick number five. Killing all the idiots without getting hit and minimizing the time you slow down.
Since you were a morph ball, you couldn't do any chargeing. This one is all up to your missiles.
Actually that's not true. As you'll recall, the worm may be in one of two places when you get here. Either far right, or far left. If it's to the right as it was in my run, you will have no charge time. You'll need to unmorph in the air and aim diagonally down at it, and fire two shots right into it. Then you'll need to drop down to the bottom of the dip, and fire two missiles straight forward.
Trust me when I say you must drop down before you fire, otherwise the missiles will usually go OVER the flying dudes, and you will die. It cuts it close, but you'll still have time to kill the first one before it hits you when you drop down.
The second contingency, if the worm is to the left, consists of you quickly missiling the flying dudes by shooting left in mid air, and hitting them when they're high, then charging your beam just in time to kill the worm. That also, cuts it very close, and is no easier, though it is probably a bit faster.
I: morph and bomb on through. And then you have tricky trick number six, the final one. The wall jump off the little block.
The key to pulling this off is to unmorph LATE. What you want to do is be holding left as you're falling down the shaft, then you'll move left in the air and unmorph just as you're feet are about level with the top of the block. Or whichever part of you is at the bottom of that ball. The unmorph will slow you a bit, allowing you to hit right and jump, which will cause you to spin into the side of the block, then you just hit left and jump again to jump off. It's not so bad once you've practiced it. Knowing when to unmorph is paramount in that trick. To soon and you'll land ON the block, too late and you'll be too low to jump off the side. Remember, the BOTTOM of samus must be against the side of the block for the wall jump to work. Wait too long and it's a no-go.
Something I forgot to mention before, is that when you lay a bomb, it's good to be in your human form, not ball form, when it explodes. This only applies to times when you're trying to go straight down. A ball form will be thrown up and away when the bomb explodes, and it will take longer for you to go down. But a human form will not. If you must bomb another block below you, just remorph into the ball as soon as it explodes. It should save a little time.
Kill all the worms, with your beam or missiles as required, and use the x's for missile refills.
I mentioned that many things can make you fire a charged shot. Morphing is one of those things. If you morph while charged, you will shoot it. Note how I morph and kill the worm ahead of me lower in this room, as I drop down the right side.
J: A nothing room
K: Morph and lay a bomb on the break blocks, then unmorph and shoot a missile at the flying thing when it gets close so it won't hit you while waiting for the bomb to explode.
At the stairway structure at the end, do a slight hop at the edge of the first one and you won't land on the second one. Landing is bad.
L: It wouldn't be fair to call this room tricky. Just annoyingly time consuming. I think the video speaks for itself, wall jumping off the left pillar will clear you over the red things usually. If you have to maneuver a bit to avoid them, do so
You only need the metal pillar to rise a little bit to give you the extra height you need to make the jump. Don't stand on it for much longer than you need, or it will waste valuable seconds
A charge shot or charged spin jump would have taken the red guys out, but since you morph so much you never get the chance to build it up :( Actually, you probably can build up a charge in time to take out the last red dude, and I probably could have gotten away with not landing between them if I'd tried that. But oh well
M: a looong shaft. Wall jump off the left, and you will go high. Make sure you have a charge to take out the worm waiting for you
It seems this room is designed just to slow you down. Well, move up ever more and get to the door. I'm a poet and I don't know it.
N: You'll first meet the spiky bouncy thing here. It's very annoying. If you shoot or kill it, it will shoot and kill back. One full charge takes it out, unfortunately it's so short that only half of your charge beam will hit it. But a missile will hit it too, so fire your charge beam followed up by a missile. Remember, hitting R to activate your missiles will simultaneously fire off your charge. Use it for convenience in situations like these. And make sure to jump the green spikes it shoots after you kill it.
O: Jump short, cause time in the air is slower than on the ground.
P: And he is safe! Something I only just now noticed, is that you can land on the save platform with a short jump after being already partially through it. Time in the air is bad, so jump late as you can.
:09 on the clock. Now that wasn't so bad, was it?