Metroid Fusion 1% Run
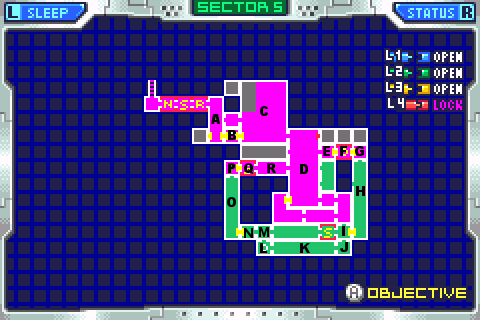
Behold the mighty reference map, and all it's glory.
ARC II
Seems like we only barely left this sector.
Believe it or not, this time around it isn't quite as mellow as it was last time, even though last time was twice as long. See last time, only the big tall crab room (O on the above map) was something that could really trip me up. This time there's several things. Let's get started.
A: Saved after the computer again, because I couldn't unload a shine if it were dipped in gold.
Kill the guy below you, make sure to not hit left until you clear the ladder, 'twould be bad to grab.
Now you want to move left against the yellow door, then go right, cause we're building a boost.
B: It's Monstro! Hi Monstro! Bye Monstro.
C: Alright, last time we were here we shot down as we dropped, and had enough time to charge again to kill the second floaty. This time we don't drop though. But we CAN build a boost.
As you may have seen elsewhere on the site, this is a little trick Ivory Phoenix came up with. I could have done it the first time through PYR, too, but live and learn.
Anyways, if you run off a ledge, then hit down at just the right time upon landing you shine!
The timing is kind of harsh, there's very little room for error, so this tripped me up a very lot. But it's at the beginning of the segment, so I'll forgive it
The charge is to take out the second guy, since the boost obviously takes out the first.
And now we use our shine to spark up without touching the ladder. Take that, ladder!
And from here on it's the same as last time.
D: Just move on to the right door. Don't worry, the bombers won't hurt you if you're fast.
E: Woah, de ja vu.
F: Times two!
G: It's true.
H: Have a nice trip, see you next fall.
Nothing different for the most part, but at the bottom we're going to morph before going in the door.
Remember what I said last segment about determining factors? They're what precicely determines how fast you can progress.
Yeah, pretty much every time you need to use a power bomb, that's the determining factor. They take so much forever to kerplode, that eeeeeverything else becomes miniscule in comparison to how much you have to wait for it.
So whenever you need to use a power bomb, use it as soon as bloody possible, so you won't have to wait long.
In the next room, we'll need to use one. So we'll want to lay it as soon as the room is entered, so we're morphing now :P
I: Like I said, then unmorph and, here's another Tricky McStumble.
Alright, you see how I was in just the right spot that I drop down when the bomb explodes? that's not easy. In fact, it's even more not easy than you'd think.
I have taken the liberty of studying this room veeeerrrrryyy carefully. The dogs, the biting, the dropping, once again:
Alright, I have come to a conclusion about fusion's positioning system, based on what I see here.
What I figure, is that samus' position is a number, but it is not the same as the number of pixels. Like, samus might be standing here, on this pixel, or she might be standing there, on that pixel, but her position in that 'number', whatever it is, can be one of a ton.
I'll try and explain better.
you see, while that power bomb was deciding to explode, I had PLENTY of time (stupid slow power bomb) to align myself pixel perfectly with the background. And as sure as I'm standing here, the same position would yield different results
There is no pixel at which you can be sure she'll drop. There's 2 at which she MIGHT drop.
now, sometimes if you tap left, real real real fast, she'll move a pixel left. Sometimes she'll just make the 'walk' animation for a second, but stay still.
But she doesn't stay still. She just doesn't move over a pixel. But her numerical position in the game, whatever it may be, still changes.
Using savestates, I was able to determine that if she's on a pixel, and doesn't fall down a hole, but then you tap a direction real quick and she doesn't change pixels, she DOES now fall down the hole.
To put it strangely, you need to be on the right "side" of a pixel in order to drop down that hole when the bomb kerplodes. Whether you fall is not based on which pixel you're at. It's based on that numerical value. And where you need to be in this case is kind of between pixels.
It really is pretty tough. More than any room, I probably had to reset because of this one. You don't have all that much time to position yourself, and hardly enough to decide just which side of a pixel you think you're on. Brings whole new meaning to 'pixel perfect', eh?
But as you can see, I managed it this time. Go team!
J: Explosions! The statue of liberty! DAMN YOU! YOU BLEW IT UP!
Morph when you leave. It's the NEW courtesy.
K: Dun-dun dun dun-daaaa, alright, there's a giant armored killing machine on your butt. What do you do?
Well you tick her off of course. If you want to be fast at least.
Alright, see where I lay a power bomb? That's more or less the soonest it can be and still clear away the power bomb blocks in the wall off to the left.
Go to these blocks, morph, and get in them.
You can tell how fast you were in this room by how close you get to being shot when you leave. Morph before leaving.
L: Lay a bomb as you enter, then start firing like crazy at the crabbies, because they suck and you have nothing better to do while your power bomb takes a shower and shave before exploding.
Alright, when it explodes, wall jump up.
M: quick quick quick
N: FASTER you FOOLS!
O: Yep, this room again. You'd think all my experience with it in 14 would have made me real good at it.
The truth is I'm never 100% good at these tricks when I start recording, I just get good enough so I can conceivably do them all in one run with enough attempts.
The O room was never one I got terribly good with. But since it was the only "issue" in 14, I didn't have to be to start trying to get the segment :P
I had to get good with it now though. It's the same story as last time, jump short and whatnot.
Oh yeah, you know you were fast if you get to the top and kill the crab before it shoots. If it shoots first, you were slow, and you're going to get hit with the ouchie. Don't be slow, unless you don't care about damage.
P: Land left, same as before
Q: Also same as before, charge and release the instant the door transition starts. Man this game is quirky.
R: "Hey Billy Bob, what's that big shiny thing coming toward us?"
"I dunno, Bobby Bill, but it's comin' aweful fast"
"Do you think we should move, Billy Bob?"
"I dunno, Bobby Bi--"
D: You remember the jump and hang, right? Yeah, sure you do. Liar.
Again use the charge beam to take out any bombers in your way. And oh yeah, morph when you leave.
C: Power bomb the instant you enter. And move on through.
Now you could unmorph as soon as you're out of that little tunnel, but then you're probably going to stop to take out those two floaties without being hit.
I really don't think moving as a morph ball is slower than moving on foot. The only reason to be on foot all the time is you can build speed boosts earlier. But that ain't happening here.
So unmorph close to the first floaty so he'll be up by the time you get to him.
Now fire your wide beam (of which a WHOLE THIRD) can reach the second floaty when it's on the ground, then angle down when you get close and it's a gonner.
B: Hey Monstro, how ya hanging?
A: Ah, there's a crabby above the door, here. He wasn't here when we were exiting in episode 14.
He's going to fire some ouchies right away, too. Ouchies that will hit you if you jump too early. So jump late, after you've run left a ways. Then wall jump up, climb the ladder a bit to get high enough to make it out.
And we're done. :30 on the clock. Now THAT'S what I'm talkin' bout.