Metroid Fusion 1% Run
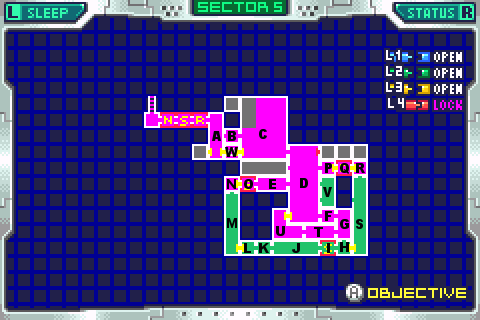
Behold the mighty reference map, and all it's glory.
ARC
Wow, what an ugly map. But I have GOOD NEWS everyone. Despite how twisted and convoluted the path through this sector is, it's actually pretty easy. In fact I was able to take the whole thing in one chunk, despite passing two savepoints along the way. Kind of makes up for taking NOC in 3, eh?
Yes, ESPECIALLY after the last segment, this one is a present. There's no random factors that could force you to restart, and indeed there's no tricks that will require horrible retries either. In fact, it's not a very good segment for showmanship either because of that. But heck, I'm not going to complain ;)
Well there's not much to explain, but you paid for commentary so you'll get it. Looots a rooms to cover so let's get started.
A: This is probably one of about 3 places in the whole segment that can muck you up. And if you've been doing a run yourself, and managed to complete the other 13 segments and all the stuff they throw at you, then there's probably not much of anything that can muck you up here.
Basically you've got these blocks on the right wall you need to shoot. As you drop past, you fire a normal shot, then as you drop lower you missile the crab, then as soon as you land you jump and missile the second block in the hole you made, then grab it and roll through. And... that's it.
B: An extention of A. What you need to do in this room consists of exactly 2 things: unmorph, and go through the door. Preferably in that order.
C: Alright, this room is full of floaties. Floaties are awesome, cause they're always in the same place and not at all random. They are kinda tough to get rid of though, so you'll need to get creative. Just do what I do.
Alright, that first charge I fired takes out the first guy, and it was done early enough so that I have another charge by the time I get to the second one.
That wall jump up has to be decently high to make it over the ledge. Then just climb the ladder, no way to skip it at this point. Be charging of course.
I jump off and grab the ledge when I'm just high enough to do it. Again, use the background as reference.
Now at this point you got some floaties to take out. The good news is, if you're hanging on a ledge with a fully charged beam, you can fire AS you pull yourself up, and the beam will travel along the ground. So even though floaties are usually too low to shoot without crouching (or aiming diagonally), here's a third way to go about it.
Again, I only release the fire button for a split second, and the beam hits the first dude, and by the time I hit the second I have a full charge to unload on him. And that's how you beat the floaties.
On the drop down, I again use the background to mark where I am and need to be horizontally. Then I hit A to spin and fire again right after when I'm near the bottom to break the spin, so I can land on the ledge by the door, since coming out of a spin slows you down (which means it's usually something to avoid, but in this case it's speedy)
D: There's some crazy dive bomber things in this room. They kinda suck, as they have some randomness to them, but they'll still never get in your way so no contingency plans are needed. Just keep a charge with you at all times and take them out if any are coming at you.
See how I went under one? Yeah he'll never be a problem. Save your charge for the bomber below him.
And shoot the floor and move on left. You're going left to build a speed boost. The only trick to getting through this room fast is just to know the room. And it's not as complicated a room as it looks.
E: Alright, the only problem is the crabby who's going to be on the celing here. His position will change SLIGHTLY depending on if he moves left or right, but really he's in the same place either way. Don't bother killing him, as you can't before he shoots anyways. You'll need to jump the ouchie he shoots, and when you land, start running right through the door, and you'll get your boost.
D: We're back here, running with a full charged beam I hope. Fire to take out the bomber ahead of you, sometimes he'll be in your way, sometimes he won't, if he's not it just means you won't hit anything, no biggy.
And you can see where the speed blocks start just by the shape of the ground there. Shine while half on/half off, this is nothing new, same as segment 9. And if you had to retry segment 9 a lot like me (wow, I DO like referencing that segment) then you got pretty good at it, so nothing major here.
Drop down, spark left as soon as you're low enough, don't worry, the bomber won't get to you before you spark (provided you didn't delay too much)
Be holding the fire button when you hit, and charge as you fall, and unleash on the bomber down there if he's in your way. If he ain't, just fire into nothingness.
Mid-air morph, by now you've done so many that it's impossible to screw up. Bomb the wall, move on through. When you roll off the ledge, unmorph to hit the ground running so to speak. That bomber I missiled may or may not be in your way, but be ready to missile him if he is.
aaand in the door.
F: Now the thing about dive bombers is they like to launch themselves at you if they see you. They see you if you're horizontal of them, and in the same direction they're facing. Apparently they can see through walls. You can use this to control them though.
First thing to do is to lay a bomb by the wall. Now those bombers trapped in there, they could be at a hundred different combinations of positions, but they all work the same way. Jump once or twice after laying your bomb, and they'll dive into the wall, and not harass you. If some get stuck low on the wall, use your missiles.
G: Use the background (as always) as reference for where you need to be horizontally, then fire down and drop.
H: Hold left when you're through the hole and you can land on the ledge by the door.
I: Do you think I've done anything tricky enough to need saving? Yeah, me neither.
J: Jump the beehives, shortest hop you can. Actually, even if you're too close to clear the beehive, you'll kind of teleport to the top of it. The same kind of thing happened with those cocoons in TRO, I'm sure you remember.
K: Something about mustard samus on a blueberry background, makes me nauseous...
L: And mustard samus conquers the mustard doors.
M: Ah, a room with some bite to it. Enter with the charge and wall jump high to land on the crab and kill it with a spin.
You can't jump to the upper ledge from there, so you have to jump to the lower and hop up. By now the crab just fired, so he won't again, so you can just jump past him without worry.
Now the hardest part, when you hit the gap in the roof, fire straight up and IMMEDIATELY spin jump after. Also don't let go of fire when you shoot. It's a spin jump right, that goes left right after (if you started the jump left you'd hit the celing), then wall jump up off the block you didn't shoot. At the height, fire left along the celing to take out crabby there. Then as you land, fire diagonally at the celing, and jump on out. This trick takes some practice, and I pity the fellow who don't have the savestates to practice with if they're trying this.
N: See that you land as left as you can, you're going to be starting a boost from here on.
O: One trick done does not a save need. Yoda I am. Also we need to run through to build that boost.
Now to make the boost work, you'll need to fire to open the right door as soon as you enter the room, then immediately recharge. As you exit, angle up. As SOON as the toor transition starts (and your charge beam is all full) you release, in transition.
If you release too late (even if it's just late in the transition) then for some reason, you won't fire fast enough to open the gate in E when you come out of it. But if you fire soon, you will. Actually I didn't know about this trick at first, but Trebor pointed it out, making me re-do the segment. Thankfully, as I've said, the segment is mellow, and of all the ones to re-do this is probably one of my top 3 choices.
E: If you did like I said, the gate rises in time for you to boost on through, and the boost kicks in before any crabbies become an issue. Just be sure to shoot the door on your way out. And manners.
D: Back here again. Use the background to mark where you need to jump, and jump high through the gap and grab the ledge. Use the charge on the bomber above you if he's acting suspicious.
P: Be ready to shoot the gate when you enter
Q: Ice Missiles! Yay?
Let's talk about ice missiles. Remember all the enemies that you could kill with one missile whenever you didn't have time to charge? Well... that don't work anymore. Anything you hit with a missile now, even the weakest creature in the world, will not die, and will certainly not get out of your way. It'll just get frozen, and stay in your way, until you shoot again. Missiles to not do rapid fire. Frankly, I'd just as soon do without this upgrade. The value of your missiles as a 'kill without slowing down' backup are drastically decreased.
Oh well, what can be done.
R: Fire down and drop through
S: Just hold left the whole way down and you'll be fine.
H: Alright, you need to shoot the celing out before the x's combine, so hop to do that when you enter, then land back by the door. When the x is growing, jump above it and fire an ice missile down, and you should land on it with minimal time loss. Jump again as soon as you land.
G: That wall jump out of the hole saves some time, but not much more than just grabbing the left ledge. It's mostly for show. Out the door we go
T: This room is bothersome because it costs a lot of time. But nothing really difficult here. Just kill the crab from afar. Firing right about where I do is right about the farthest you can be and still have it hit.
It will reform in the same place every time, so use the background to mark where you need to be standing and kill it with a charge as it appears.
Then just stand on the left side of the platform, and once the beehive begins to grow, floor it, hitting him with an ice missile as you appraoch.
U: Boost through and once you've killed off all the bombers, shine and spark straight up. Then out the door with you.
D: Here again? This is the last thing that may cause concern. In my video there's two bombers above me, that top one isn't always a problem, but encase he is, you're going to need to jump high off the wall so you can land on the ledge rather than hang onto it, allowing you to shoot the fool.
If you muck up and grab the ledge, you can just hang out there until he passes, but it's time lost.
Shoot the right wall
V: Wall jump, shoot and hang. Not a problem if you know where you need to be shooting.
D: Ain't this a fun room? Charge as soon as you unmorph, preferably have the fire button still held from where you shot the wall in V.
That first bomber is never a problem, the second one might be so shoot him and recharge if he's being ornery. At the top take a mighty leap over the little outcropping, and if any bombers are level and dive at you then your charged self can take one out.
C: Charge now just so you won't have to do it later. Up the ladder as usual. Do the same thing you did last time in reverse: Use the background to mark when you're high enough to jump to the ledge, release your charge as you pull yourself up, release another charge on the second floaty.
And charge as you fall. Now you're going to have to be holding left and hit the left side of the outcropping near the bottom, but STOP holding left once you hit it, see you don't want to run into the floaty below you, but you DO want to be close enough so he'll start floating. When you land, THEN you can move left under him and take out the other floaty with your charge.
Out the door
W: Just run through, ignore the scary monster on the celing.
A: Emergency in sector 3! Wall jump up, but you'll need to grab the right ladder and climb for a moment in order to clear the left ledge. Alternatively, just hang onto the left ledge and pull yourself up rather than clearing it entirely.
And that's that. Saved before the computer cause once you enter sector 3, no saving. *shudder*. That's going to make it a baaaaad segment.
:23 on the clock. Decently decent for all we got done in this segment.